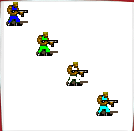
昨天研究了BB同志发的算法一文,实验了一晚上,终于有点收获,发出来给大家共享.
我查阅了很多关于Png格式的文章,最后得到的心得就是,对于"索引类型的图片",即肯定包含PLTE调色板的Png图片,就可以通过对调色板的修改,再通过CRC算法生成新的验证码,再还原成新图片就可以得到所要的效果,为此,我写了如下的类.
/*这个类提供了一个转换图片颜色的方法getColoredImage,只要将源图片的路径以及需要转换的新颜色作为参数调用就可以得到转换后的图片.
用于PNG图片变色的类 使用要求,需要美工将原始图片的需要换色的点 设置为纯红色0xff0000 */ import java.io.*; import java.lang.*; import javax.microedition.lcdui.*; public class coloredImage { public coloredImage() { } public Image getColoredImage(String s, int newcolor) { try { byte[] pixel; InputStream is = getClass().getResourceAsStream(s); int i = 0; while (is.read() != -1) { i++; } pixel = new byte[i]; is = null; is = getClass().getResourceAsStream(s); is.read(pixel); imgConvert(pixel, newcolor); return (Image.createImage(pixel, 0, pixel.length)); } catch (Exception e) { return null; } } public void imgConvert(byte content[], int color) { try { int start = 0; int newcolor = -1; for (int idx = 0; idx < 8; idx++) { if (content[idx] == 0x50 && content[idx + 1] == 0x4c && content[idx + 2] == 0x54 && content[idx + 3] == 0x45) { start = idx; } } for (int idx = 0; idx < 4; idx++) { newcolor = pixelConvert(content[start + idx], newcolor); } int r, g, b, length; length = (content[start - 4] & 0xff << 24) | (content[start - 3] & 0xff << 16) | (content[start - 2] & 0xff << 8) | (content[start - 1] & 0xff); for (int i = 0; i < length; i++) { r = content[start + 4 + i] & 0xff; g = content[start + 4 + i + 1] & 0xff; b = content[start + 4 + i + 2] & 0xff; if (r == 255 && g == 0 && b == 0) { r = color >> 16 & 0xff; g = color >> 8 & 0xff; b = color & 0xff; content[start + 4 + i] = (byte) r; content[start + 4 + i + 1] = (byte) g; content[start + 4 + i + 2] = (byte) b; } newcolor = pixelConvert(content[start + 4 + i], newcolor); newcolor = pixelConvert(content[start + 4 + i + 1], newcolor); newcolor = pixelConvert(content[start + 4 + i + 2], newcolor); } newcolor = ~newcolor; content[start + 4 + length] = (byte) (newcolor >> 24); content[start + 4 + length + 1] = (byte) (newcolor >> 16); content[start + 4 + length + 2] = (byte) (newcolor >> 8); content[start + 4 + length + 3] = (byte) (newcolor); } catch (Exception e) {} } /** * CRC检验算法 * @param pixel 像素 * @param color 颜色值 * @return */ public int pixelConvert(byte pixel, int color) { int tmp = pixel & 0xff; color ^= tmp; for (int idx = 0; idx < 8; idx++) { if ((color & 1) != 0) { color = color >>> 1 ^ 0xedb88320; } else { color >>>= 1; } } return color; } }
相应的我把我的主类写出来供大家参考其用法.
import javax.microedition.midlet.*;
import javax.microedition.lcdui.*;
import java.util.*;
import com.nokia.mid.ui.*;
import java.io.*;

public class pengzhuang extends MIDlet {
    class test extends FullCanvas {
        Image[] a;
        byte[] pix;
        coloredImage ci;
        public test() {
            ci = new coloredImage();
            a = new Image[4];
            a[0] = ci.getColoredImage("/char.png", 0x0000ff);
            a[1] = ci.getColoredImage("/char.png", 0x00ff00);
            a[2] = ci.getColoredImage("/char.png", 0xffffff);
            a[3] = ci.getColoredImage("/char.png", 0x00ffff);
        }

        public void keyPressed(int i) {
        }

        public void paint(Graphics g) {
            g.setColor(0xffffff);
            g.fillRect(0, 0, getWidth(), getHeight());
            g.drawImage(a[0], 0, 0, 0);
            g.drawImage(a[1], 30, 30, 0);
            g.drawImage(a[2], 60, 60, 0);
            g.drawImage(a[3], 90, 90, 0);
        }
    }


    private Display display;
    test t;
    public pengzhuang() {
        try {
            t = new test();
        } catch (Exception e) {
        }
        display = Display.getDisplay(this);
    }

    public void startApp() {
        display.setCurrent(t);
    }

    public void pauseApp() {

    }

    public void destroyApp(boolean boo) {

    }
}
其中用到的源图是
![]()
运行程序后的效果为

